Tampilkan postingan dengan label Networking. Tampilkan semua postingan

Rabu, Juni 07, 2017

Cara crimping kabel UTP

Cara Crimping Kabel UTP ke RJ45 (Straight dan Cross). Setelah mengetahui Berbagai Kabel Jaringan Komputer Lan,  kita akan melakukan crimping terhadap kabel UTP menggunakan konektor RJ-45 agar bisa digunakan untuk menghubungkan hardware komputer.
nah, sebelum kita mulai, bahan-bahan yang harus dipersiapkan adalah kabel utp, konektor RJ-45, dan Tang crimping dan kalo lebih bagus kalo kamu ada Lan Tester untuk menguji kabel, jika tidak, masih bisa menggunakan cara lain untuk menguji nya..

Alat2 yg dibutuhkan :
- Tang Crimping
- Kabel UTP
- Lan Tester

RJ-45Kabel UTP terdiri dari 2 jenis, yaitu Straight dan Cross, kabel straight digunakan untuk menghubungkan dua buah hardware yang berbeda seperti menghubungkan PC ke Switch/Hub, dan kabel Cross digunakan untuk menghubungkan dua buah hardware yang sama seperti dari PC ke PC, Laptop ke Laptop.Cara Crimping Kabel UTP ke RJ-45
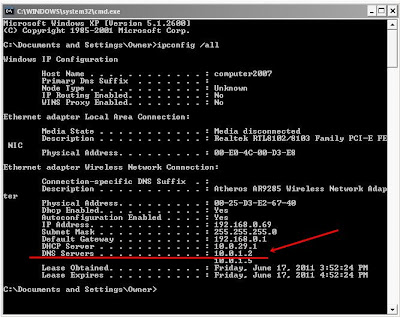
Pengertian IP Address Adalah dan Kelas IP Address

Untuk membuat kabel Straight, susunan warna yang digunakan adalah :
Sususan warna pada ujung 1 = Putih Orange, Orange, Putih Hijau, Biru, Putih Biru, Hijau, Putih Coklat, Coklat.
Sususan warna pada ujing 2 sama dengan ujung 1.

Untuk membuat kabel Cross, susunan warna yang digunakan adalah :
Susunan warna pada ujung 1 = Putih Orange, Orange, Putih Hijau, Biru, Putih Biru, Hijau, Putih Coklat, Coklat
Susunan warna pada ujung 2 yaitu = Putih Hijau, Hijau, Putih Orange, Biru, Putih Biru, Orange, Putih Coklat, Coklat 

LANGKAH LANGKAH CRIMPING KABEL STRAIGHT DAN CROSS.

Cara Crimping Kabel UTP ke RJ-45
  1. Kupas kulit kabel selebar 2 cm.
  2. Susun rapi delapan kabel yang terdapat didalam sesuai dengan gambar dan penjelasan diatas.
  3. Luruskan kabel yang masih kusut.
  4. Ratakan ujung kabel dengan memotong nya menggunakan tang crimping.
  5. Setelah yakin urutan warna benar dan ujung kabel sudah rata, masukan kabel kedalam konektor RJ-45 , pastikan ujung kabel menyentuh ujung RJ-45, dan jepitlah menggunakan Tang Crimping.
  6. Setelah menyelesaikan kedua ujung kabel, uji menggunakan Lan tester, jika semua lampu menyala, berarti kabel tersebut telah di crimping dengan benar dan bisa digunakan.

Jumat, November 16, 2012

Konfigurasi BGP di Juniper


kali ini kita akan belajar konfigurasi protokol BGP dengan router juniper di GNS 3. nah, di dalam BGP sendiri terdapat 2 macam yaitu :
  • IBGP = sebagai protokol untuk infomasi antar AS yang sama. ( konfigurasi )
  • EBGP = sebagai protokol untuk informasi beda AS. (Konfigurasi )
nah  kali ini kita akan menggabungkan kedua nya,antara IBGP dan EBGP.
siapkan GNS 3 dan router Junipernya dan uat topology seperti dibawah:


Nah Setelah kita buat toology seperti di atas saat nya kita untuk konfigurasi tiap routernya.
  • Semarang
root@Semarang# show
## Last changed: 2012-06-17 16:59:57 UTC
version 8.3R2.8;
system {
    host-name Semarang;
    root-authentication {
        encrypted-password “$1$3T8rkYBw$F2lhbybMkAYpOM2ubkbNA/”; ## SECRET-DATA
    }
    syslog {
        user * {
             any emergency;
        }
        file messages {
             any notice;
            authorization info;
         }
        file interactive-commands {
            interactive-commands any;
        }
    }
}
interfaces {
    fxp0 {
        unit 0 {
            family inet {
                address 222.222.222.1/30;
            }
        }
    }
    fxp1 {
        unit 0 {
            family inet {
                address 222.222.222.9/30;
            }
        }
    }
    fxp2 {
        unit 0 {
            family inet {
                address 212.222.222.1/30;
            }
        }
    }
    fxp3 {
        unit 0 {
            family inet {
                address 212.222.222.9/30;
            }
        }
    }
    lo0 {
        unit 0 {
            family inet {
                address 1.1.1.1/32;
            }
        }
    }
}
routing-options {
    static {
        route 0.0.0.0/0 next-hop [ 212.222.222.2 212.222.222.10 ];
    }
    autonomous-system 11;
}
protocols {
    bgp {
        group internal {
            type internal;
            export all;
            neighbor 212.222.222.2 {
                peer-as 11;
            }
            neighbor 212.222.222.10 {
                peer-as 11;
            }
        }
        group external {
            type external;
            export all;
            neighbor 222.222.222.2 {
                peer-as 10;
            }
            neighbor 222.222.222.10 {
                peer-as 12;
            }
        }
    }
}
policy-options {
    policy-statement all {
        term 1 {
            from {
                protocol direct;
                route-filter 1.1.1.1/32 exact;
            }
            then accept;
        }
    }
}
  • AccessNet_ITTELKOM
root@AccessNet_ITTELKOM# show
## Last changed: 2012-06-17 15:23:06 UTC
version 8.3R2.8;
system {
    host-name AccessNet_ITTELKOM;
    root-authentication {
        encrypted-password “$1$JC2ci6tP$.boHuK0K3Vza83Ll6g/VJ1″; ## SECRET-DATA
     }
    syslog {
        user * {
            any emergency;
        }
        file messages {
             any notice;
            authorization info;
        }
        file interactive-commands {
             interactive-commands any;
        }
    }
}
interfaces {
    fxp0 {
        unit 0 {
            family inet {
                address 222.222.222.2/30;
            }
        }
    }
    lo0 {
        unit 0 {
            family inet {
                address 4.4.4.4/32;
            }
        }
    }
}
routing-options {
    static {
        route 0.0.0.0/0 next-hop 222.222.222.1;
    }
    autonomous-system 10;
}
protocols {
    bgp {
        group external {
            export all;
            peer-as 11;
            neighbor 222.222.222.1;
        }
    }
}
policy-options {
    policy-statement all {
        term 1 {
            from {
                protocol direct;
                route-filter 4.4.4.4/32 exact;
            }
            then accept;
        }
    }
}
  •  Surabaya
root@Surabaya# show
## Last changed: 2012-06-17 15:49:08 UTC
version 8.3R2.8;
system {
    host-name Surabaya;
    root-authentication {
        encrypted-password “$1$lH9zdg27$BZEz7FagxtUfRhrVURV6E.”; ## SECRET-DATA
    }
    syslog {
        user * {
            any emergency;
        }
        file messages {
            any notice;
            authorization info;
         }
        file interactive-commands {
            interactive-commands any;
        }
    }
}
interfaces {
    fxp0 {
        unit 0 {
            family inet {
                address 222.222.222.10/30;
            }
        }
    }
    lo0 {
        unit 0 {
            family inet {
                address 5.5.5.5/32;
            }
        }
    }
}
routing-options {
    static {
        route 0.0.0.0/0 next-hop 222.222.222.9;
    }
    autonomous-system 12;
}
protocols {
    bgp {
        group external {
            export all;
            peer-as 11;
            neighbor 222.222.222.9;
        }
    }
}
policy-options {
    policy-statement all {
        term 1 {
            from {
                protocol direct;
                route-filter 5.5.5.5/32 exact;
            }
            then accept;
        }
    }
}
  • UNDIP
root@UNDIP# show
## Last changed: 2012-06-17 15:48:39 UTC
version 8.3R2.8;
system {
    host-name UNDIP;
    root-authentication {
        encrypted-password “$1$HVZD.G7j$L9OHJa5KbKw0GMHf/2TtE0″; ## SECRET-DATA
     }
    syslog {
        user * {
            any emergency;
        }
        file messages {
            any notice;
            authorization info;
        }
        file interactive-commands {
            interactive-commands any;
        }
    }
}
interfaces {
    fxp0 {
        unit 0 {
            family inet {
                address 212.222.222.2/30;
            }
        }
    }
    fxp1 {
        unit 0 {
            family inet {
                address 212.222.222.5/30;
            }
        }
    }
    lo0 {
        unit 0 {
            family inet {
                address 2.2.2.2/32;
            }
        }
    }
}
routing-options {
    static {
        route 0.0.0.0/0 next-hop 212.222.222.1;
    }
    autonomous-system 11;
}
protocols {
    bgp {
        group internal {
            type internal;
            export all;
            neighbor 212.222.222.1 {
                peer-as 11;
            }
            neighbor 212.222.222.6 {
                peer-as 11;
            }
        }
    }
}
policy-options {
    policy-statement all {
        term 1 {
            from {
                protocol direct;
                route-filter 2.2.2.2/32 exact;
            }
            then accept;
        }
    }
}
  • UNNES
root@UNNESS# show
## Last changed: 2012-06-17 15:50:34 UTC
version 8.3R2.8;
system {
    host-name UNNESS;
    root-authentication {
        encrypted-password “$1$O3qD491L$7geLK74jz1yzQzQT.QCSJ1″; ## SECRET-DATA
    }
    syslog {
        user * {
             any emergency;
        }
        file messages {
            any notice;
            authorization info;
         }
        file interactive-commands {
            interactive-commands any;
        }
    }
}
interfaces {
    fxp0 {
        unit 0 {
            family inet {
                address 212.222.222.10/30;
            }
        }
    }
    fxp1 {
        unit 0 {
            family inet {
                address 212.222.222.6/30;
            }
        }
    }
    lo0 {
        unit 0 {
            family inet {
                address 3.3.3.3/32;
            }
        }
    }
}
routing-options {
    static {
        route 0.0.0.0/0 next-hop 212.222.222.9;
    }
    autonomous-system 11;
}
protocols {
    bgp {
        group internal {
            type internal;
            export all;
            neighbor 212.222.222.5 {
                peer-as 11;
            }
            neighbor 212.222.222.9 {
                peer-as 11;
            }
        }
    }
}
policy-options {
    policy-statement all {
        term 1 {
            from {
                protocol direct;
                route-filter 3.3.3.3/32 exact;
            }
            then accept;
        }
    }
}
nah, setelah itu. kita coba cek. Penulis mengeceknya di salah satu router, yaitu di router wilayah semarang.
  • Show route

Ok.terlihat bahwa BGP sudah aktif.

  • Show BGP summary

Dari gambar diatas bisa kita lihat bahwa trafik packet input dan output sudah berjalan, ini menandakan bahwa BGP sudah aktif.
Selanjutnya kita melihat keterangan BGP yang telah kita buat dengan perintah :
  • show route protocol bgp detail

Sekarang kita akan lihat neighbornya dengan cara :
  • Show BGP Neighbor

kemudian kita akan lihat group dari BGP nya, seperti ynag kita bahas di atas, mana yang internal mana yang external
  • Show bgp group

selanjutnya tahap akhir, kita coba ping dari AccessNet
  • Ping ke arah UNDIP ( ping 212.222.222.5 )

  • Ping ke arah Surabaya ( ping 212.222.222.10 )

alhamdulillah, semuanya sudah berhasil ,kini tinggal anda mencobanya dengan penambahan router yang lain semoga bermanfaat.

Configuration IPsec


I want shared about configuring IPSec!
BTW, why should use IPsec?
      IPSec or IP Security is designed to provide interoperability, quality, cryptographic-based network security for IPv4 and IPv6. services provided include access control, integrity, relationships, data origin authentication, protection opponent answers, confidentiality (encryption), and restrictions on traffic flow confidentiality. These services are available in the IP layer, which provides protection to the IP layer and subsequent protocols. IP Security provides a series of services to secure communication between computers in a network. It also adds to the integrity and confidentiality, the recipient of optional answers (the answer sorting), and data origin authentication (via key management SA), IP Security also provides access control for traffic through it. These objectives are met by met through the use of two traffic security protocols, namely AH (Authentication Header) and ESP (Encapsulating Security Payload) and the use of procedures and cryptographic key management protocol. If this mechanism is implemented should not harm the user, host and other internet components mengguankan no mechanism to protect their data traffic. This mechanism should be flexible in using a security algorithm, which means that the module can use the algorithm according to the implementation choices without affecting the other components. Use the default algorithm should facilitate interoperability in the Internet in general. Pengguanaan algorithm in conjunction with the protection of traffic (IPSec traffic protection) and key management protocol (key management protocols), aims to allow system and application developers to improve the quality high, the Internet layer, cryptographic-based security technology.
   IPSec protocol combined with the default algorithm is designed to provide the security of Internet traffic is good. However the security provided by the protocol is in fact dependent on the quality of the implementation, which is beyond the scope of the implementation of these standards. Besides a computer system or network security is a function of many factors, including individual, physical, procedure, source of suspicion and the computer's security practices in the real world. IPSec is only one component of the security system architecture. Security obtained from the use of IPSec depends on the operating environment in which the implementation of IPSec run. For example, damage to the security of the operating system
Topologinya seperti ini


konfigurasi PC0
!
!berikan ip 192.168.1.2/24
!Gateway 192.168.1.1

Konfigurasi PC1
!
!berikan ip 192.168.2.2/24
!Gateway 192.168.2.1
Konfigurasi Router TASIK
!
!hostname TASIK
!interface FastEthernet0/0
ip address 192.168.1.1 255.255.255.0
duplex auto
speed auto
!interface Serial0/3/0
ip address 10.10.1.1 255.255.255.252
clock rate 19200 ( ingat, karena dia DCE maka konfigurasi clock rate untuk syncronisasi diperlukan )
!
!ip route 0.0.0.0 0.0.0.0 10.10.1.2
Konfigurasi router BANDUNG
!
hostname Bandung
interface Serial0/3/0 (karena sebagai DTE dari TASIK maka untuk syncronisasi clock rate, dia sudah otomats mengikuti DCE TASIK ).
!
ip address 10.10.1.2 255.255.255.252
!
interface Serial0/3/1
ip address 10.11.1.2 255.255.255.252
clock rate 19200
!router rip
network 10.0.0.0
Konfigurasi Router ISP
!
hostname ISP
!
interface Serial0/3/0
ip address 10.11.1.1 255.255.255.252
!
interface Serial0/3/1
ip address 10.12.1.1 255.255.255.252
clock rate 19200
!router rip
network 10.0.0.0
!
Konfigurasi Router Semarang
!
hostname Semarang
!
interface Serial0/0/0
ip address 10.12.1.2 255.255.255.252
!
interface Serial0/0/1
ip address 10.13.1.2 255.255.255.252
clock rate 19200
!
!
router rip
network 10.0.0.0
!
Konfiguasi Router Yogya
!
hostname Yogya
!
interface FastEthernet0/0
ip address 192.168.2.1 255.255.255.0
!
interface Serial0/1/0
ip address 10.13.1.1 255.255.255.252
!ip route 0.0.0.0 0.0.0.0 10.13.1.2

For the standard configuration of each node has been done, now that yes we will use IPsec for Tunnel of TASIK to YOGYA, because it is necessary in setting the router is concerned, namely, routers tasik and Yogya.

konfigurasi IPSec Router TASIK
!
crypto isakmp policy 1
encryption aes
authentication pre-share
group 5
crypto isakmp key cisco address 10.13.1.1 ( peer router jogya arah Semarang)
!
!
crypto ipsec transform-set vpn esp-aes esp-sha-hmac
!
!
access-list 100 permit ip 192.168.1.0 0.0.0.255 192.168.2.0 0.0.0.255
!
!
crypto map vpn 1 ipsec-isakmp
set peer 10.13.1.1
set transform-set vpn
match address 100
!
interface Serial0/3/0
crypto map vpn
!

konfigurasi IPSec Router Yogya
!
crypto isakmp policy 1
encr aes
authentication pre-share
group 5
!
crypto isakmp key cisco address 10.10.1.1 ( peer TASIK arah bandung )
!
!
crypto ipsec transform-set vpn esp-aes esp-sha-hmac
!
access-list 100 permit ip 192.168.2.0 0.0.0.255 192.168.1.0 0.0.0.255
!
!
crypto map vpn 1 ipsec-isakmp
set peer 10.10.1.1
set transform-set vpn
match address 100
!
interface Serial0/1/0
crpto map vpn
!
ok ! sudah saatnya kita coba lakukan tes ping dan mengetahui koneksi yang sudah terbangun dari router tasik ke yogya..
PING :

Selanjutnya, kita cek koneksi di router

Sekarang kita mau lihat PDU nya..
ketika paket datang dari SEMARANG menuju Yogya

Semoga bermafaat.!

Sabtu, Oktober 20, 2012

Bandwidth WiFi network.

ozcorp@team


Now I will try to share about how to take the bandwidth without using software netcutThis way I do because I am so angry at my friends who both use wifi because often use netcut. My annoyance prompted me to look for other ways cowering behind them, and the results were incredible, in use for youtube streaming not use buffering (* depending on the quality of wifi *). Okay increasingly curious of the better straight to the very thing in waiting, check it out.

Follow these steps without lacking any:
  • Go to RUN and then type cmd.exe, or can also directly type cmd.exe in the search field in the start menu (* for those who use Windows 7*).
 
  • Then it will appear like this.
 
  • Then Typing ipconfig/all in cmd. This command serves to display information about the connection where you are now. 


  • The result will be as below. containing all sorts of information about your computer. Then find the name DNS server then you must remember, and if necessary, write first in notepad. 


  • Then, scrolling down your cmd.exe, then you will find the command as an initial order for the type. Now the command ketikannya different again. Type the following command ping 10.0.1.2-L 500-t. and the code came from 10.0.1.2 DNS Servers listed above (my DNS Server). Replace with the DNS Server you.
 
  • Press Enter. It will appear as below process. Let the process continues as long as you're online using wifi where your place. When you need to reduce it, just do it in closed cmd.exe.


This method aims to take the bandwidth is being used by other people in one network hotspot / wifi equally guys use. If you are not satisfied with the speed can be changed 500 to 1000 or 2000. But I suggest do not overdo the pity of others. and in addition the method is valid only in windows linux it if I had not tried.

ozcorp@team

Rabu, Oktober 17, 2012

How To Install Appserv 2.5.10

ozcorp@team


I will now try to share about how where how to install appserv 2.5.10, because at my college all using appserv, so I took the initiative for posting this tutorial.

first of all:

First download the application below:

Download appserv 2.5.10
Then follow the steps below:
Extract the files that you have downloaded and click 2x on appserv-win32-2.5.10.exe


Appserv
Select Next and I Agree


Appserv
Just let the installer default location and Next


Appserv
Click Next button again


Appserv

In the Server Name localhost fill in the boxes below and fill in your email address, leave the port at the default position is 80


Appserv
Enter the password to what you want, when it then click the Install button.


Appserv

Wait until the installation is complete like the look below,


Appserv
And than klik tombol Finish


Appserv

Then will come the order to enter the Username and Password. Fill username as root, this is the default username when first we will enter phpmyadmin.
(suggestion: change your default username to another username, for the safety of your data later).
And enter your password, click the OK button


Appserv
If successful it will appear as above, and then on the Create new database with the name of the database contents whatever you want, in this example I am trying to use the database name, and then click the Create button.

Download file:  Cara Install Appserv 2.5.10.doc

Rabu, Oktober 10, 2012

About TCP/IP


TCP IP is the communication protocol for communication between computers on the Internet. TCP IP stands for Transmission Control Protocol / Internet Protocol.
TCP IP defines how electronic devices (like computers) must be connected to the Internet, and how the data should be transmitted between them.
In the process of data transmission, there are some problems to be solved. First, the data must be sent to the right computer, according to its purpose, and the data must be in one piece with no damage (the damage of data can occur if there is signal interference from outside or are distant destination computer network).
Therefore there needs to be a mechanism that prevents the destruction of this data, and made some rules that cooperate with each other. A set of rules to govern the process of data transmission is referred to as data communication protocols. This protocol is implemented in the form of a computer program (software) contained on the computers and other communication equipment. TCP IP is a set of protocols designed to perform functions of communications data.

In the TCP IP standard there are several protocols for handling data communication:

• TCP (Transmission Control Protocol) communication between applications
• UDP (User Datagram Protocol) simple communication between applications
• IP (Internet Protocol) communications between computers
• ICMP (Internet Control Message Protocol) for errors and statistics
• DHCP (Dynamic Host Configuration Protocol) for dynamic addressing

Basically the data communication is the process of sending data on a computer network, that data is sent from one computer to another. in order to transmit data, the computer must be added a special tool, known as a network interface (network interface). This type of network interface varies, depending on the physical media used to transfer data.
The workings of the TCP IP
A set of TCP / IP protocol is modeled by four layers of TCP IP,
TCP IP layer consists of four layers of a stratified set of protocols.

The fourth layer is the TCP IP:

- Network Interface Layer, is responsible for sending and receiving data to and from physical media
- Internet Layer, is responsible for the delivery of the package to the correct address.
- Transport Layer, responsible for opening up communication between the two hosts / computers.
- Application Layer, this layer is all applications that use the TCP / IP link.

In the TCP IP, occurs submission of data from the protocol that is in one layer to the protocol that was in another layer. Each protocol treats the information it receives from other protocols as data.
So the basic concept and workings of TCP IP layer may provide an understanding of the notion of TCP IP.

ozcorp@team

Selasa, Oktober 09, 2012

DHCP Server Debian Linux


How to Configure DHCP Server on Debian Linux is what I will discuss in this article. DHCP server is a machine or a server that provides IP automatically to the client. So with the DHCP server then the client does not need to set the IP in such a way as it is set directly by the DHCP server. So let's get on with it to install and configure the DHCP server.
For setting the IP on debian on a post yesterday I mentioned that I now consider in passing only for IP address setting us straight to the stage of installation.

# Apt-get installs dhcp3-server

After the installation is successful, the next steps edit dhcpd.conf

# Nano / etc/dhcp3/dhcpd.conf

Since I use the IP address 192.168.1.1 to 192.168.1.0 subnet and netmask is filled with class C. Then for the range of IP number to IP how will we love the client, make sure the first class.

Option domain-name-servers 192.168.0.1; = to point to the DNS server IP
Option domain-name "www.nady.net"; = to direct internal domain
Option routers 192.168.1.1; = gateway ip directed at 192.168.1.1
Option broadcast-address 192.168.0.255; = broadcast address
Default-lease-time 600; = default time allowed for borrowing IP
Max-lease-time 7200; = Maximum time allowed for borrowing IP

The next steps edit dhcp3-server to specify the Ethernet how are we going to give the DHCP server.

# Nano/etc/default/dhcp3-server

 Look at the INTERFACES = "eth0"

Means the client that we will give the client an IP automatically via Ethernet 0 or eth0. If it is then we immediately restart dhcp server.

# /Etc/init.d/dhcp3-server

Remember that each time restarting plans through folders init.d.