Sabtu, Oktober 20, 2012

Bandwidth WiFi network.

ozcorp@team


Now I will try to share about how to take the bandwidth without using software netcutThis way I do because I am so angry at my friends who both use wifi because often use netcut. My annoyance prompted me to look for other ways cowering behind them, and the results were incredible, in use for youtube streaming not use buffering (* depending on the quality of wifi *). Okay increasingly curious of the better straight to the very thing in waiting, check it out.

Follow these steps without lacking any:
  • Go to RUN and then type cmd.exe, or can also directly type cmd.exe in the search field in the start menu (* for those who use Windows 7*).
 
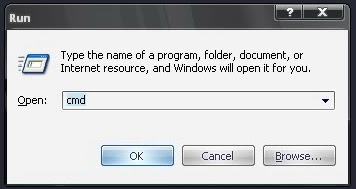
  • Then it will appear like this.
 
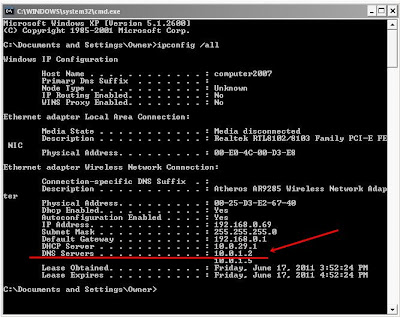
  • Then Typing ipconfig/all in cmd. This command serves to display information about the connection where you are now. 


  • The result will be as below. containing all sorts of information about your computer. Then find the name DNS server then you must remember, and if necessary, write first in notepad. 


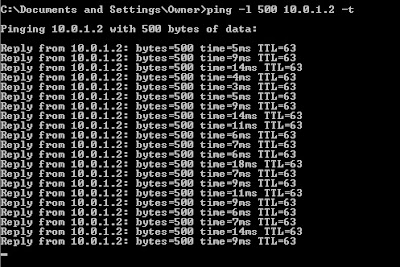
  • Then, scrolling down your cmd.exe, then you will find the command as an initial order for the type. Now the command ketikannya different again. Type the following command ping 10.0.1.2-L 500-t. and the code came from 10.0.1.2 DNS Servers listed above (my DNS Server). Replace with the DNS Server you.
 
  • Press Enter. It will appear as below process. Let the process continues as long as you're online using wifi where your place. When you need to reduce it, just do it in closed cmd.exe.


This method aims to take the bandwidth is being used by other people in one network hotspot / wifi equally guys use. If you are not satisfied with the speed can be changed 500 to 1000 or 2000. But I suggest do not overdo the pity of others. and in addition the method is valid only in windows linux it if I had not tried.

ozcorp@team

Rabu, Oktober 17, 2012

How To Install Appserv 2.5.10

ozcorp@team


I will now try to share about how where how to install appserv 2.5.10, because at my college all using appserv, so I took the initiative for posting this tutorial.

first of all:

First download the application below:

Download appserv 2.5.10
Then follow the steps below:
Extract the files that you have downloaded and click 2x on appserv-win32-2.5.10.exe


Appserv
Select Next and I Agree


Appserv
Just let the installer default location and Next


Appserv
Click Next button again


Appserv

In the Server Name localhost fill in the boxes below and fill in your email address, leave the port at the default position is 80


Appserv
Enter the password to what you want, when it then click the Install button.


Appserv

Wait until the installation is complete like the look below,


Appserv
And than klik tombol Finish


Appserv

Then will come the order to enter the Username and Password. Fill username as root, this is the default username when first we will enter phpmyadmin.
(suggestion: change your default username to another username, for the safety of your data later).
And enter your password, click the OK button


Appserv
If successful it will appear as above, and then on the Create new database with the name of the database contents whatever you want, in this example I am trying to use the database name, and then click the Create button.

Download file:  Cara Install Appserv 2.5.10.doc

Rabu, Oktober 10, 2012

About TCP/IP


TCP IP is the communication protocol for communication between computers on the Internet. TCP IP stands for Transmission Control Protocol / Internet Protocol.
TCP IP defines how electronic devices (like computers) must be connected to the Internet, and how the data should be transmitted between them.
In the process of data transmission, there are some problems to be solved. First, the data must be sent to the right computer, according to its purpose, and the data must be in one piece with no damage (the damage of data can occur if there is signal interference from outside or are distant destination computer network).
Therefore there needs to be a mechanism that prevents the destruction of this data, and made some rules that cooperate with each other. A set of rules to govern the process of data transmission is referred to as data communication protocols. This protocol is implemented in the form of a computer program (software) contained on the computers and other communication equipment. TCP IP is a set of protocols designed to perform functions of communications data.

In the TCP IP standard there are several protocols for handling data communication:

• TCP (Transmission Control Protocol) communication between applications
• UDP (User Datagram Protocol) simple communication between applications
• IP (Internet Protocol) communications between computers
• ICMP (Internet Control Message Protocol) for errors and statistics
• DHCP (Dynamic Host Configuration Protocol) for dynamic addressing

Basically the data communication is the process of sending data on a computer network, that data is sent from one computer to another. in order to transmit data, the computer must be added a special tool, known as a network interface (network interface). This type of network interface varies, depending on the physical media used to transfer data.
The workings of the TCP IP
A set of TCP / IP protocol is modeled by four layers of TCP IP,
TCP IP layer consists of four layers of a stratified set of protocols.

The fourth layer is the TCP IP:

- Network Interface Layer, is responsible for sending and receiving data to and from physical media
- Internet Layer, is responsible for the delivery of the package to the correct address.
- Transport Layer, responsible for opening up communication between the two hosts / computers.
- Application Layer, this layer is all applications that use the TCP / IP link.

In the TCP IP, occurs submission of data from the protocol that is in one layer to the protocol that was in another layer. Each protocol treats the information it receives from other protocols as data.
So the basic concept and workings of TCP IP layer may provide an understanding of the notion of TCP IP.

ozcorp@team

Selasa, Oktober 09, 2012

DHCP Server Debian Linux


How to Configure DHCP Server on Debian Linux is what I will discuss in this article. DHCP server is a machine or a server that provides IP automatically to the client. So with the DHCP server then the client does not need to set the IP in such a way as it is set directly by the DHCP server. So let's get on with it to install and configure the DHCP server.
For setting the IP on debian on a post yesterday I mentioned that I now consider in passing only for IP address setting us straight to the stage of installation.

# Apt-get installs dhcp3-server

After the installation is successful, the next steps edit dhcpd.conf

# Nano / etc/dhcp3/dhcpd.conf

Since I use the IP address 192.168.1.1 to 192.168.1.0 subnet and netmask is filled with class C. Then for the range of IP number to IP how will we love the client, make sure the first class.

Option domain-name-servers 192.168.0.1; = to point to the DNS server IP
Option domain-name "www.nady.net"; = to direct internal domain
Option routers 192.168.1.1; = gateway ip directed at 192.168.1.1
Option broadcast-address 192.168.0.255; = broadcast address
Default-lease-time 600; = default time allowed for borrowing IP
Max-lease-time 7200; = Maximum time allowed for borrowing IP

The next steps edit dhcp3-server to specify the Ethernet how are we going to give the DHCP server.

# Nano/etc/default/dhcp3-server

 Look at the INTERFACES = "eth0"

Means the client that we will give the client an IP automatically via Ethernet 0 or eth0. If it is then we immediately restart dhcp server.

# /Etc/init.d/dhcp3-server

Remember that each time restarting plans through folders init.d.